OpenSeaMap-dev:HW-logger/en:Depth sounder mobil: Unterschied zwischen den Versionen
Markus (Diskussion | Beiträge) (Die Seite wurde neu angelegt: „{|border="0" cellpadding="6" cellspacing="0" width="100%" !style="background:#E3E3E3;" | Deutsch !style="backgr…“) |
Markus (Diskussion | Beiträge) (→Tips from Airmar) |
||
| (Eine dazwischenliegende Version desselben Benutzers wird nicht angezeigt) | |||
| Zeile 71: | Zeile 71: | ||
| | | | ||
|- | |- | ||
| − | | 1 || | + | | 1 || TTL>RS-232 converter || mini RS-232 to TTL |
| [http://www.ebay.de/itm/mini-RS232-zu-TTL-Converter-MAX232-Chip-Seriell-fur-Arduino-Raspberry-Pi-I03P-/172365855706 3 €] | | [http://www.ebay.de/itm/mini-RS232-zu-TTL-Converter-MAX232-Chip-Seriell-fur-Arduino-Raspberry-Pi-I03P-/172365855706 3 €] | ||
| | | | ||
| Zeile 150: | Zeile 150: | ||
* To make this adjustment, loosen the mounting screws, and slide the transducer 1/2" lower and re-test. You may need to re-drill holes. If you do so, be sure to seal the old holes with manufacturer approved, below the waterline caulking or epoxy. | * To make this adjustment, loosen the mounting screws, and slide the transducer 1/2" lower and re-test. You may need to re-drill holes. If you do so, be sure to seal the old holes with manufacturer approved, below the waterline caulking or epoxy. | ||
* You also may want to add another plastic wedge (supplied with the installation kit) so that when looking at the side of the transducer the back or stern of the transducer is noticably lower than the bow or front of the transducer. This angle will not affect depth readings. Doing this adjustmant will help keep the transducer in hard contact with the water at higher speeds. | * You also may want to add another plastic wedge (supplied with the installation kit) so that when looking at the side of the transducer the back or stern of the transducer is noticably lower than the bow or front of the transducer. This angle will not affect depth readings. Doing this adjustmant will help keep the transducer in hard contact with the water at higher speeds. | ||
| + | |||
| + | |||
| + | [[Kategorie:Depth]] | ||
Aktuelle Version vom 24. Januar 2025, 22:36 Uhr
| Deutsch | English |
|---|
| Water depth |
|---|
| Depth-Website |
| The project |
| Measuring strategy |
| Upload NMEA-data |
| Metadata help |
| Connecting NMEA-Logger |
| Hardware Logger |
| Software Logger |
| Mobile sounder |
| Ship network |
| Data formats |
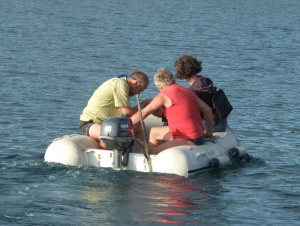
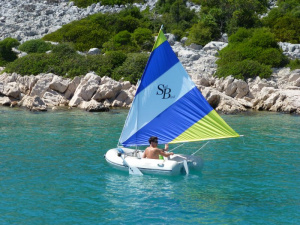
During the development cruise in Croatia, a mobile measuring unit was built
to measure shallow water depths in bays, harbors and marinas with the dinghy,
i.e. when the ship is at anchor or at the pier.
Inhaltsverzeichnis
List of components
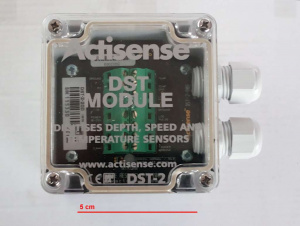
| 1 | Echolot | Actisense DST-2 | 135 € |
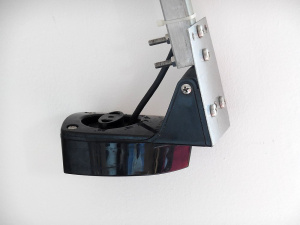
| 1 | Depth sensor | Airmar P48W | 90 € |
| 1 | GPS | e.g. Garmin GPSMAP-60 (used) plus Garmin data cable or GPS-mouse plus USB>RS232-transducer or Ublox-NEO-6M, transducer, regulator |
- 25 € 40 € + 10 € 10 € + 3 € + 3 € |
| 1 | Logger | OpenSeaMap-NMEA-Logger | 30 € |
| 1 | Battery | z.B. 12V/2,4AH-Mini-PB-accu or old Motorcycle battery or old accu of a cordless screwdriver |
12 € - - |
| 1 | Transducer rod | self-made with screw clamp | 10 € |
Total cost approx. 300 €
Depth sounder
Actisense DST-2-200
Standard Actisense DST-2-200 outputs an NMEA DBT 1 time per second.
Data accurate to decimeters only. With special firmware accurate to centimeters.
Airmar P48W
Depth sounder transducer from Airmar.
Transducer rod
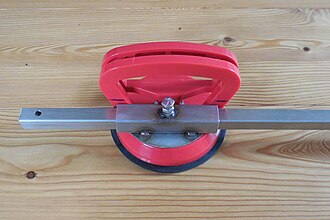
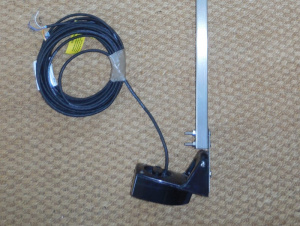
The encoder rod we have built from a V2A square tube 20x20.
Bottom is a steel plate for mounting the encoder screwed.
The rod with a screw clamp screwed to the stern board of the dinghy.
Alternatives:
- Professional mounting clamp 20 € (Construction manual)
- Transducer rod with clamp 55 € (Picture)
- Screw transducor plate onto a "plastic" household cutting board. Fix it permanently to the stern of the boat with Sika.
- Mobil: fasten rod with suction cup 5 € /suction lifter. Screw directly to flat hull surface, or Plexiglas pane at the stern of the boat, or fasten with Sikaflex. Suction cup holds perfectly.
GPS modul
Cheaper and better than an old handheld GPS is a GPS module, for example a Ublox-NEO-6M.
The NEO-6M has a different output level than the logger. Therefore you need a TTL>RS232 converter in between.
For both you need a voltage converter from 12V battery to 3.3V operating voltage.
- List of components
| 1 | GPS | Ublox-NEO-6M | 12 € | |
| 1 | TTL>RS-232 converter | mini RS-232 to TTL | 3 € | |
| 1 | 12V>3.3V | 9 € | gets too hot | |
| 1 | Voltage regulator | 12V>5V>3.3V | 3 € Cigarette lighter > USB > voltage divider | Alternative |
- Details about level converter
The NEO-6M transmits TTL level. The logger can receive RS-232 and RS-422. Both interfaces are standardized. RS-232 uses -12V for a logical 1 and +12V for a logical zero. The RS-422 does it similarly only that there current is used for the distinction. So -20mA for a 1 and +20mA for a zero. If you would connect the GPS module directly, the voltage would be much too small and the signals for 0 and 1 would be mixed up. TTL RS-232 works with 5V or 3V3 and a 1 always means +5V (3V3) and a zero means 0V. Reversing the polarity is of limited help. It could even lead to a short circuit, which would damage both devices. Therefore use at least one RS-232 driver.
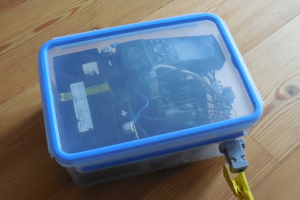
Installation in Tupperware box
Tupperware box with waterproof and tight closing lid (clips):
- Attach battery to the bottom with Velcro strips, use illuminated toggle switch for power supply.
- Connect and interconnect GPS, depth sounder and logger.
- Lead connection for depth sounder transducer with RS-232 out of the box.
- (connector must be screwable so that it is not unintentionally pulled out during operation).
Operation
Flying assembly, electronics in tied plastic bag, only battery cable and sensor cable look out.
Transducer rod attached to dinghy stern with screw clamp. Screw clamp and rod secured with tie so that they do not go diving.
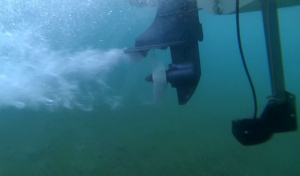
Adjust the transducer so that it is not in the screw current of the outboard screw (echo sounder does not work in air turbulence).
Mount transducer on starboard side of propeller (less turbulence with right turning propeller).
- Attention
- Transducer is the lowest point (not the outboard screw!) - so be careful when mooring!
- Fasten the transducer cable to the transducer rod in such a way that it cannot be pulled into the screw ;-)
- Offset
- 30 cm
Pictures
More ideas
- Deeper: new Bluetooth depth sounder with app for Android and Rapberry (200 €)
- Airmar P66: low cost transom mount depth sounder that outputs NMEA-0183 directly (110 €)
- Airmar DT800: Thru-hull mount depth sounder that outputs NMEA-2000 directly (220 €)
- GPS module with L1 raw data
- GPS mouse
Tips from Airmar
Installation guide for transducers
- Transom mount transducers will not work at any speed if they are installed on a powerboat boat with inboard motors, or any sailboat.
- If you have a single engine outboard, or I/O, make sure that the unit is mounted on the starboard side of the boat, so it is free from most prop wash.
- If you have a twin, or triple engine outboard, or I/O make sure that the unit is mounted between the motors, as low as possible, either on the flat section of the keel (if any), or slightly left or right of the vee.
- If you are still seeing poor performance at speed, this usually indicates that the transducer needs to be mounted lower so that more of the face of the transducer is in contact with the water at speed.
- To make this adjustment, loosen the mounting screws, and slide the transducer 1/2" lower and re-test. You may need to re-drill holes. If you do so, be sure to seal the old holes with manufacturer approved, below the waterline caulking or epoxy.
- You also may want to add another plastic wedge (supplied with the installation kit) so that when looking at the side of the transducer the back or stern of the transducer is noticably lower than the bow or front of the transducer. This angle will not affect depth readings. Doing this adjustmant will help keep the transducer in hard contact with the water at higher speeds.
